5 Projects You Can Do With Cardboard Boxes

After a big move, one of the biggest pains is having what seems like millions of cardboard boxes laying around the house. Having a bunch of boxes stacked in your living room doesn’t exactly say “I’m home.” Instead of making that extra trip to get rid of all of your cardboard boxes, check out these five projects you can do with cardboard boxes to create some masterpieces!
Basket
 A woven basket filled with snacks.
Need something to hold the toilet paper in your bathroom that’s not a total eyesore? Turn a cardboard box into a jute rope basket that will perfectly accent any room and help you stay away from the flat surface curse.
Materials:
-
Jute Rope
-
White Fabric
-
Glue
How to:
-
Cut off top flaps of the box
-
Hot glue the jute rope to the outside of the box about ¾ of the way up
-
One side at a time, line the top of the rope with hot glue and fold over one edge over the fabric (½”) and press it against the glue
-
When the fabric has been attached on all sides, fold it up and inside of the box, using additional glue to secure it.
Check out the full tutorial here
Storage Bins
 A blue and white storage bin.
What a better way to reuse cardboard boxes than storage bins? The best part is that they’re super simple to make, you can customize them with any color, pattern, or texture, and nobody will ever be able to tell that they’re just cardboard boxes in disguise!
Materials:
-
Packing tape
-
Knobs
-
Contact paper(s)
How to:
-
Cut the flaps off of the top of the box
-
Cover the outer four sides of the box with contact paper
-
Cover the bottom of the box with contact paper
-
Cover the inside of the box with contact paper
-
Drill one hole in the front of the box
-
Add the knob (use a screw to secure it)
Check out the full tutorial here.
Hexagonal Tray
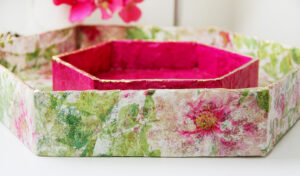 Hexagonal jewelry trays made out of cardboard.
Trays can get expensive, especially when you’re trying to find one that’ll perfectly match your decor. Luckily, with a little cardboard box help, you can create a tray that will match your decor and save you some serious money, too.
Materials:
-
Modge Podge glue
-
Hot glue
-
Brush
-
White paint
-
Napkins (choose a cool pattern)
How to:
-
Cut the cardboard into a hexagon base
-
Cut out 6 identical rectangles to use for the sides of the tray
-
Glue each rectangle onto an edge of the hexagon base
-
Let dry
-
Paint the tray white
-
Let dry
-
Use the Mod Podge glue to glue the napkins down onto the tray
-
Continue until the tray is completely covered
Check out the full tutorial here.
Cardboard Cacti
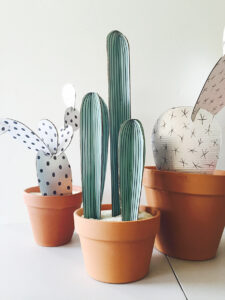 DIY cactuses made out of cardboard.
If you’re someone who struggles to keep real plants alive and don’t want to spend a lot of money on a fake one, then these cacti DIY are the perfect way to show your (fake) green thumb around the house.
Materials:
-
Paint
-
Brush
-
Sharpie
-
Rice
-
Clay Pot
-
Template
-
Tape
How to:
-
Print off the cacti shape templates and scale to size
-
Cut out templates
-
Trace them onto cardboard
-
Cut the shapes out
-
Paint cardboard
-
Let dry
-
Add patterns onto cardboard
-
Cover the hole in the pot with tape
-
Fill the pot with rice
-
Put cactus pieces together in the pot
Check out the full tutorial here.
Lantern
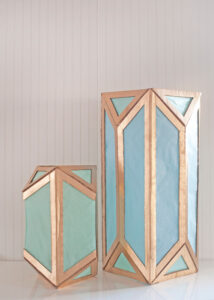 DIY blue lanterns made out of cardboard.
Add a little statement to any room with these DIY lanterns. Whether it be your living room, dining room, bedroom, or even bathroom, the little twinkle that these lanterns bring will light up anyone’s face with a smile.
Material:
-
Tissue paper
-
Hot glue
-
Ruler
-
Gold spray paint
-
White spray paint
-
Twine
-
Duct tape
How to:
-
Print and cut out the template
-
Use the template to measure and draw each lantern piece
-
Follow the template to attach all pieces correctly
-
After all of the pieces are connected, prime cardboard with white spray paint
-
Let dry
-
Add a top coat of gold spray paint
-
Let dry
-
Take the tissue paper and cut out window shapes of the lantern
-
Reach inside the lantern and glue the tissue paper to the open windows
-
Add in your battery-operated LED light
-
Secure the lid tightly on the top
Check out the full tutorial here.
The best part about DIY decor? You get to add some beautiful pieces to your new home and get rid of those pesky boxes, too! If you find yourself left over with some boxes that are still full of stuff from the move that you don’t quite need yet, we’d love to help out! Check out our locations to find the closest Space Shop Self-Storage to you!